Tips for Care and Enjoyment!
Two years ago now, my husband asked, “what we can we do to our back patio to make it more enjoyable in the summer?” I immediately said, “a hot tub!” Just like I would also love to have a sauna at my home, I never thought that seriously about it because I thought it would be outrageously expensive. Then I started looking around, and realized you can buy an inflatable one for about $500 on Amazon, so my mind was quickly getting around the idea of actually getting one.
I will tell you my family’s own experiences, with a few tips we’ve learned along the way, so you have a stress-less hot tub experience, because that’s what it should be!
Note, as an Amazon Associate I earn from qualifying purchases. If you click on the photos and links, you’ll go right to the products.
IT’S A LITTLE WORK AT FIRST…there are some things that are a bit frustrating and take some time to figure out.
Setting it up. The first time you set it up, it will be a royal PAIN. There are several elements to it, valves for water and air, and if it’s not near an outlet, you have to get extensions. And it should be near a hose/water source. There are instructions, but we found them to be inadequate, since they’re only photos! Ugh. So it’s definitely a two-person job, to figure out what goes where!
Putting it away in the Fall/Winter is equally annoying. We’re preparing ourselves to do it this year and are dreading it. I wish we could keep it up year round…maybe if we didn’t live somewhere with brutal winters. You ARE able to keep it up year round (there is a special set of instructions in the manual if you do), but I don’t want to risk it freezing here. So if you’re taking it down, you’ll need ample room/a place to store it. Ours is in the garage.
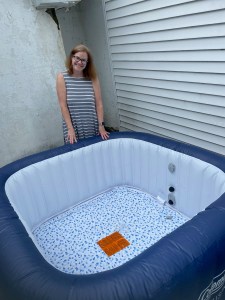
Finding the right location. We also found out the hard way (ie after it was already set up), that you should assemble it on a very level surface. We only had one spot on our patio that made the best sense for the tub to go, since it was in a corner with access to water and power. So we set it up there, only to discover it was uneven. So on one side the water was deeper, and the other more shallow. It’s fine if you’re in there by yourself, but if you’re with others it’s a bit strange. So when the second summer rolled around and we were ready to set it up, my husband built a ramp of sorts out of pressure-treated wood. He measured it out and positioned the tub on it, and it worked beautifully! The hot tub was now perfectly level and everyone could experience the right water depth.
Filling it with water takes almost all day- beware. It’s easy to start getting really excited when you see it full of air and looking like a hot tub should! With a regular hose it took a good 8 hours. And then, getting the water to temperature (104 degrees is the highest) takes yet another 10 hours or so. I would suggest letting it heat overnight. You can set heating on a timer, but we choose to leave it on continuous heating, so it’s always warm. Just know that if you have any sort of power outage, it will interrupt the continual heating system. When heat is lost it will start beeping, but if it’s outside like ours, you may not hear it and it will cool down. Nothing is worse than deciding to go out and use it, and having the temperature down to 80 degrees. Boo.
Covering it. Our tub has a cover with snaps. I love the cover for keeping debris out of it and keeping it hot. But the snaps are a major pain! They are very hard to manage, and there are at least ten of them. We generally leave everything unsnapped, and the cover still stays on fine. Even just leaving maybe one snapped on each side works; but dealing with a lot of snaps is a bit frustrating.
Chemicals. Once you’ve mastered the balance of the chemicals, all is good and they won’t need very frequent attention. But I will be honest, it took us a decent amount of time to get it right. The test strip bottle has a chart showing what the correct colors should be, but it peeled off the bottle so we had to look online and thankfully found this one.

I will tell you, if you aren’t adding the correct amount of chemicals, the tub will go through filters like crazy. We learned this the hard way. So I suggest getting a pack of filters so you have them at your disposal, should this happen to you.
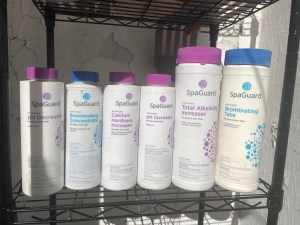
We found it a bit confusing, because the chemical names (find these in a pack on Amazon) do not necessarily match the names on the color chart. What? It’s true. Some are self-explanatory but some are definitely not. So you may want to refer to something like this- Hot Tub & Spa Chemicals: The Ultimate Water Care Guide.
BUT WE LOVE IT!
We’ve had our tub for two years, so are past these annoyances of set up, chemicals, etc. If these don’t seem like they will frustrate you or like us, you’ll get over it pretty quickly, then in all honesty, you will LOVE having this. Why?
Health. Hot tubs are so relaxing and wonderful for your health and circulation. I’m sure you’ve been in them when traveling, and my inflatable tub serves the same purpose as a permanent one. It’s plenty hot enough, and the bubbles are strong enough for sure. Just the fact that you take time for yourself and some self-care is enough of a reason in itself!
Entertainment. My kids really enjoy using ours, and had a good number of sleepovers with friends wanting to come and use it in the summers! So it’s a great addition to an outside patio. The girls came out with their speakers- listened to music and caught up with friends. Along the same lines, it makes a nice ending to a dinner at home for the family or my husband and me.

Ease of Care. You do need to get the hang of the chemicals needed, but once you figure that out, you’re good to go!
As a last note, here are some accessories for the hot tub you might be interested in:
Skimmer. This is helpful for anything that gets in the tub like leaves and bugs. Just use it on an as-needed basis.
Cupholders. The tub we purchased comes with two, but they’re located in the console (where you choose time, temperature, etc) so aren’t too accessible when lounging in the tub itself. We got these (link) that fold over the side, so wherever you’re sitting, you can have a drink near you. And I just recently saw this floating tray you can use for snacks! Since we’re putting ours away soon , it’s too late this year, but next summer I’m getting one of these. I see it being a big hit with the girls 🙂
Cushions. As you can see in the first photo, the bottom of our tub is flat, so you need to sit on your butt or knees, and it can be a little slippery. If this is uncomfortable for you, you can always get a cushion like this, that acts like a bench to sit on more comfortably. Same with a neck-rest. People who prefer to lounge in the tub with their necks supported can opt for a cushion like this.
If you’re a fan of hot tubs and are interested in investing in one, I hope these tips we’ve learned on our journey are helpful for you! Be sure to leave me a comment and let me know!


Leave a reply to Setting up your Patio for Summer – my3girls Cancel reply